Events
The first parameter event describes why the read completed. Events are one of these:
For all Windows:
- Button click
- Window closed using X
For Windows that have specifically enabled these. Please see the appropriate section in this document to learn about how to enable these and what the event return values are.
- Keyboard key press
- Mouse wheel up/down
- Menu item selected
- An Element Changed (slider, spinner, etc.)
- A list item was clicked
- Return key was pressed in input element
- Timeout waiting for event
- Text was clicked
- Combobox item chosen
- Table row selected
- etc.
Most of the time the event will be a button click or the window was closed. The other Element-specific kinds of events happen when you set enable_events=True when you create the Element.
Button Click Events
By default buttons will always return a click event, or in the case of realtime buttons, a button down event. You don't have to do anything to enable button clicks. To disable the events, disable the button using its Update method.
You can enable an additional "Button Modified" event by setting enable_events=True in the Button call. These events are triggered when something 'writes' to a button, usually it's because the button is listed as a "target" in another button.
The button value from a Read call will be one of 2 values: 1. The Button's text - Default 2. The Button's key - If a key is specified
If a button has a key set when it was created, then that key will be returned, regardless of what text is shown on the button. If no key is set, then the button text is returned. If no button was clicked, but the window returned anyway, the event value is the key that caused the event to be generated. For example, if enable_events is set on an Input Element and someone types a character into that Input box, then the event will be the key of the input box.
Element Events
Some elements are capable of generating events when something happens to them. For example, when a slider is moved, or list item clicked on or table row clicked on. These events are not enabled by default. To enable events for an Element, set the parameter enable_events=True. This is the same as the older click_submits parameter. You will find the click_submits parameter still in the function definition. You can continue to use it. They are the same setting. An 'or' of the two values is used. In the future, click_submits will be removed so please migrate your code to using enable_events.
| Name | events |
|---|---|
| InputText | any change |
| Combo | item chosen |
| Listbox | selection changed |
| Radio | selection changed |
| Checkbox | selection changed |
| Spinner | new item selected |
| Multiline | any change |
| Text | clicked |
| Status Bar | clicked |
| Graph | clicked |
| Graph | dragged |
| Graph | drag ended (mouse up) |
| TabGroup | tab clicked |
| Slider | slider moved |
| Table | row selected |
| Tree | node selected |
| ButtonMenu | menu item chosen |
| Right click menu | menu item chosen |
Other Events
Menubar menu item chosen for MenuBar menus and ButtonMenu menus
You will receive the key for the MenuBar and ButtonMenu. Use that key to read the value in the return values dictionary. The value shown will be the full text plus key for the menu item chosen. Remember that you can put keys onto menu items. You will get the text and the key together as you defined it in the menu definition.
Right Click menu item chosen
Unlike menu bar and button menus, you will directly receive the menu item text and its key value. You will not do a dictionary lookup to get the value. It is the event code returned from WindowRead().
Windows - keyboard, mouse scroll wheel
Windows are capable of returning keyboard events. These are returned as either a single character or a string if it's a special key. Experiment is all I can say. The mouse scroll wheel events are also strings. Put a print in your code to see what's returned.
Timeouts
If you set a timeout parameter in your read, then the system TIMEOUT_KEY will be returned. If you specified your own timeout key in the Read call then that value will be what's returned instead.
Window Closed Events
Detecting and correctly handling Windows being closed is an important part of your PySimpleGUI application. You will find in every event loop in every Demo Program an if statement that checks for the events that signal that a window has closed.
The most obvious way to close a window is to click the "X" in the upper right corner of the window (on Windows, Linux.... Mac doesn't use an "X" but still has a close button). On Windows systems, the keyboard keys ALT+F4 will force a Window to close. This is one way to close a window without using a mouse. Some programs can also send a "close" command to the window.
Regardless of how the close is performed on the window, PySimpleGUI returns an event for this closure.
WIN_CLOSED Event
The constant WIN_CLOSED (None) is returned when the user clicks the X to close a window.
Typically, the check for a closed window happens right after the window.read() call returns. The reason for this is that operating on a closed window can result in errors. The check for closure is an "if" statement.
ALWAYS include a check for a closed window in your event loop.
The Window Closed If Statement
There are 2 forms you'll find for this if statement in the documentation and the Demo Programs. One is "Pythonic" the other is more understandable by beginners. This is the format you'll see most often in the PySimpleGUI materials if the window has both a button that is used to signal the user wishes to exit. In this example, I'm using a "Quit" button:
The more "Pythonic" version of this same statement is:
In case you're yelling at the documentation that the second form should always be used, remember that many of the PySimpleGUI users are new to Python. If the very first example of a PySimpleGUI program they see has that if statement in it, they will instantly be lost before they can even begin their journey. So, the decision was made to, you guessed it, go SIMPLE. The statement with the "or" is simpler to understand.
Window Closed Check
Let's put this if statement into context so you can see where it goes and how it works with the event loop
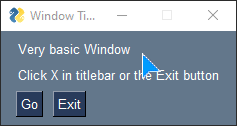
import PySimpleGUI as sg
layout = [[sg.Text('Very basic Window')],
[sg.Text('Click X in titlebar or the Exit button')],
[sg.Button('Go'), sg.Button('Exit')]]
window = sg.Window('Window Title', layout)
while True:
event, values = window.read()
print(event, values)
if event == sg.WIN_CLOSED or event == 'Exit':
    break
window.close()
Notice that the line after the while loop is a call to window.close(). The reason for this is that exiting the loop can be in 2 ways.
* The "X" is clicked
* The Exit button is clicked
If the Exit button is clicked, the window will still be open. Get in the habit of closing your windows explicitly like this.
If the user clicked "X" and closed the window, then it will have been destroyed by the underlying framework. You should STILL call window.close() because come cleanup work may be needed and there is no harm in closing an already closed window.
tkinter can generate an error/warning sometimes if you don't close the window. For other ports, such as PySimpleGUIWeb, not closing the Window will potentially cause your program to continue to run in the background. This can cause your program to not be visible and yet consuming 100% of the CPU time. Not fun for your users.
Window Close Confirmation
In 4.33.0 a new parameter, enable_close_attempted_event, was added to the Window object. This boolean parameter indicates if you would like to receive an event that a user wants to close the window rather than an event that the user has closed the window.
To enable this feature, the Window is created with something like this:
When the close attempted feature is enabled, when the user clicks the "X" or types ALT+F4, you will not get a WIN_CLOSED event like previously, you will instead get an event WINDOW_CLOSE_ATTEMPTED_EVENT and the window will remain open.
Usually this feature is used to add a "close confirmation" popup. The flow goes something like this:
- Window is shown
- User clicks X
- A popup window is shown with message "Do you really want to close the window?"
- If confirmed a close is desired, the window is closed. It not, the event loop continues on, basically ignoring the event occurred.
A Complete Example - Window Closed Confirmation (enable_close_attempted_event=True)
Returning to the example used above, there has been only 2 modifications.
- Added the parameter
enable_close_attempted_event=Trueto the call toWindow - The if statement in the event loop has changed to add a confirmation
import PySimpleGUI as sg

layout = [[sg.Text('Very basic Window')],
          [sg.Text('Click X in titlebar or the Exit button')],
          [sg.Button('Go'), sg.Button('Exit')]]

window = sg.Window('Window Title', layout, enable_close_attempted_event=True)

while True:
    event, values = window.read()
    print(event, values)
    if (event == sg.WINDOW_CLOSE_ATTEMPTED_EVENT or event == 'Exit') and sg.popup_yes_no('Do you really want to exit?') == 'Yes':
        break

window.close()
The event loop changed from a check like this:
To one like this:
    if (event == sg.WINDOW_CLOSE_ATTEMPTED_EVENT or event == 'Exit') and sg.popup_yes_no('Do you really want to exit?') == 'Yes':
        break
Let's run this last program so you can see what all this looks like to users.
In both cases that a user previously exited the window, there is now an additional confirmation step.
Timer Events
New in version 5.0 are "Window Timers". A Window Timer can be a repeating timer that sends you events on an ongoing basis, or it can be a timer that only sends a single event.
In the past, the timeout parameter for the window.read call provided a way to get a periodic timer, however this approach did not guarantee a steady stream of timer pulses. Using the timeout parameter guaranteed that you will receive an event within that amount of time. If a user does something like click a button prior to the timeout expiring, then you will not also get a timeout event.
Window Timers will provide a timer event regardless of other events that may be happening. A user can click buttons that generate events, but these events will not interfere with Timer Events.
The basic calls you will be interested in are Window.timer_start and Window.timer_stop.
The default event generated by a Window Timer is defined by the constant:
sg.EVENT_TIMER or the alias sg.TIMER_KEY
You can also define your own Window Timer event when you start your timer.
You'll find additional Window Timer calls documented in the Window call reference.