Element Justification and Alignment
There are 2 terms used in PySimpleGUI regarding positioning: * Justification - Positioning on the horizontal axis (left, center, right) * Alignment - Positioning on the vertical axis (top, middle, bottom)
Justification
Justification of elements can be accomplished using 2 methods.
1. Use a Column Element with the element_justification parameter
2. Use the Push element
The Push was added in 2021 to the tkinter port. The PySimpleGUIQt port already has an element called Stretch that works in a similar way. You could say that Push is an alias for Stretch, even though Stretch wasn't a tkinter element previously.
Push
The way to think about Push elements is to think of them a an element that "repels" or pushes around other elements. The Push works on a row by row basis. Each row that you want the Push to impact will need to have one or more Push elements on that row.
Normally, each row is left justified in PySimpleGUI (unless you've set a parameter in the Window object or the row is in a Column element that has a setting that impacts justification.
Think of the sides of a window as a wall that cannot move. Elements can move, but the side-walls cannot. If you place a Push element on the left side of another element, then it will "push" the element to the right. If you place a Push on the right side, then it will "push" the element to the left. If you use TWO Push elements and place one on each side of an element, then the element will be centered.
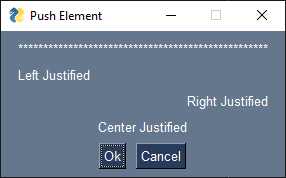
This recipe demonstrates using a Push element to create rows that have different justification happening on each row.
The first row of the layout is 50 chars so that the window will be wide enough that each row's justification will have some room to move around.
The second row doesn't need a Push element in order for the element to be left justified. However, if your entire window was right justified, then using the Push on the right side of an element would push it to be left justified.
Notice the last row of the layout. There are 2 buttons together with a Push on each side. This causes those 2 buttons to be centered.
import PySimpleGUI as sg

layout = [[sg.Text('*'*50)],
          [sg.Text('Left Justified'), sg.Push()],
          [sg.Push(), sg.Text('Right Justified')],
          [sg.Push(), sg.Text('Center Justified'), sg.Push()],
          [sg.Push(), sg.Button('Ok'), sg.Button('Cancel'), sg.Push()]]

window = sg.Window('Push Element', layout)

while True:
    event, values = window.read()
    if event in (sg.WIN_CLOSED, 'Cancel'):
        break

window.close()
Container Element Justification (element_justification parameter)
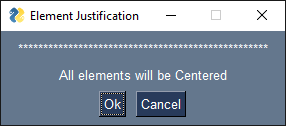
You can use Container Elements (Column, Frame, Tab and Window too) to justify multiple rows at a time. The parameter element_justification controls how elements within a container or Window are justified.
In this example, all elements in the window are centered
import PySimpleGUI as sg

layout = [[sg.Text('*'*50)],
          [sg.Text('All elements will be Centered')],
          [sg.Button('Ok'), sg.Button('Cancel')]]

window = sg.Window('Element Justification', layout, element_justification='c')

while True:
    event, values = window.read()
    if event in (sg.WIN_CLOSED, 'Cancel'):
        break

window.close()
Alignment - single rows
"Alignment" is the term used to describe the vertical positioning of elements. Within a single row, alignment is performed by using a container element or by using a one of the alignment "layout helper functions". You'll find the layout helper functions in the call reference documentation here:
https://pysimplegui.readthedocs.io/en/latest/call%20reference/#layout-helper-funcs
There are 3 functions in particular that affect vertical positioning:
* vtop - Align an element or an entire row to the "top" of the row
* vbottom - Align an element or an entire row to the "bottom" of the row
* vcenter - Align an element or an entire row to the "center" of the row
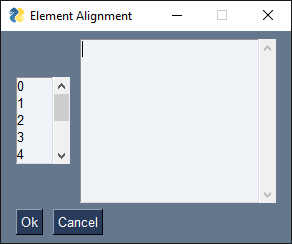
By default the alignment on each row is center.
This program uses the default alignment which will center elements on each row.
import PySimpleGUI as sg

layout = [[sg.Listbox(list(range(10)), size=(5,5)), sg.Multiline(size=(25,10))],
          [sg.Button('Ok'), sg.Button('Cancel')]]

window = sg.Window('Element Alignment', layout)

while True:
    event, values = window.read()
    if event in (sg.WIN_CLOSED, 'Cancel'):
        break

window.close()
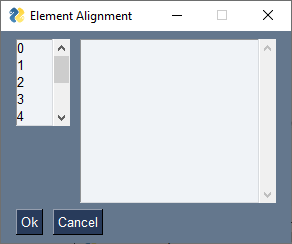
If you want to have the Listbox and the Multiline aligned at the top, then you can use the vtop helper function. Since the Listbox is the shorter height, you could add vtop just to that element. Or, you can use vtop and pass in the entire row so that if the size of one of these elements changes in the future so that the Multiline is shorter, they'll remain top aligned.
If the elements on that row were top-aligned, the window will look like this:
Here are 3 ways you can accomplish this operation.
Align only the single element
import PySimpleGUI as sg

layout = [[sg.vtop(sg.Listbox(list(range(10)), size=(5,5))), sg.Multiline(size=(25,10))],
          [sg.Button('Ok'), sg.Button('Cancel')]]

window = sg.Window('Element Alignment', layout)

while True:
    event, values = window.read()
    if event in (sg.WIN_CLOSED, 'Cancel'):
        break

window.close()
Align the entire row
import PySimpleGUI as sg

layout = [sg.vtop([sg.Listbox(list(range(10)), size=(5,5)), sg.Multiline(size=(25,10))]),
          [sg.Button('Ok'), sg.Button('Cancel')]]

window = sg.Window('Element Alignment', layout)

while True:
    event, values = window.read()
    if event in (sg.WIN_CLOSED, 'Cancel'):
        break

window.close()
Notice how using vtop in the example above replaces the entire row with just the vtop call. The reason for this is that the vtop function returns a list (i.e. a row). This means that brackets are not needed. But it looks a little odd and makes it more difficult to see where the rows are.
Newer versions of PySimpleGUI allow an extra set of brackets [ ] so that the layout appears to still be a list-per-row.
import PySimpleGUI as sg

layout = [[sg.vtop([sg.Listbox(list(range(10)), size=(5,5)), sg.Multiline(size=(25,10))])],
          [sg.Button('Ok'), sg.Button('Cancel')]]

window = sg.Window('Element Alignment', layout)

while True:
    event, values = window.read()
    if event in (sg.WIN_CLOSED, 'Cancel'):
        break

window.close()
Alignment - VPush
Just like the Push element will "push" elements around in a horizontal fashion, the VPush element pushes entire groups of rows up and down within the container they are inside of.
If you have a single VPush in your layout, then the layout will be pushed to the top or to the bottom. Normally layouts are top-aligned by default so there's no need to have a single VPush at the bottom. If you have two VPush elements, then it will center the elements between them.
One of the best examples of using VPush is when a window's size has been hard coded. Hard coding a window's size is not recommended in PySimpleGUI. The reason is that the contents inside may not fit inside your hard coded size on some computers. It's usually better to allow the window's size to "float" and be automatically sized to fit the contents.
Perhaps a better example would be if you wanted to allow your window to be resized and have the contents vertically aligned after resizing.
But, if you're determined to hard code a size and want to vertically center your elements in that window, then the VPush is a good way to go.
This example window is 300 pixels by 300 pixels. The layout is both center justified and center aligned. This is accomplished using a combination of Push and VPush elements.
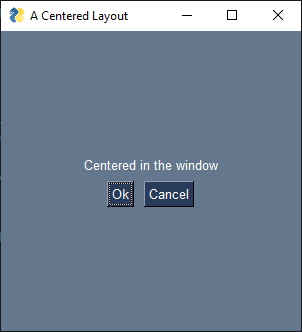
import PySimpleGUI as sg

layout = [[sg.VPush()],
          [sg.Push(), sg.Text('Centered in the window'), sg.Push()],
          [sg.Push(), sg.Button('Ok'), sg.Button('Cancel'), sg.Push()],
          [sg.VPush()]]

window = sg.Window('A Centered Layout', layout, resizable=True, size=(300, 300))

while True:
    event, values = window.read()
    if event in (sg.WIN_CLOSED, 'Cancel'):
        break