Layouts
Layouts are one of the PySimpleGUI constructs that work in a natural feeling way. A window's "layout" is simply a list of lists of elements.
To summarize from earlier descriptions of layouts - a layout is a list of "rows" of elements. Each "row" is a list. The first row is the top of the window. As you read down the lists, you're building your window, one row at a time.
If you use a code formatting tool or your coding style is to put parameters on individual lines, then you may not notice that layouts are designed to be visual representations of your window. The code itself is designed to appear similar to the window. Maybe you have to squint a lot to see the resemblance? Maybe your entire window's layout is too complex to visualize by looking at the code, but pieces of it are likely easy to visualize.
Many times your window definition / layout will be a static, straightforward to create. However, window layouts are not limited to being one of these statically defined list of Elements. You can extend a layout at runtime. You can have elements appear and disappear after your window is already running.
The real fun begins when you combine the power of Python's list comprehensions with layouts.
Where Layouts Are Used
The primary location you'll find a layout is in your window's definition. The most basic format for creating a window only requires the title and a layout.
Container Elements
The other place layouts are used are with "Container Elements". Container Elements contain what? You guessed right if you said "layouts". Containers Elements include:
ColumnFrameTab
When creating one of these elements, you'll use exactly the same format for the layout.
The Column and Frame elements can be placed directly into layouts. This is how layouts can contain layouts. There is no limit to the nesting of layouts that you can have.
The Tab element is placed in a TabGroup element with each Tab being on the first and only row in the TabGroup layout.
Finally, the Pane element contains a list of Column elements. Note that it's the only element that uses a single list rather than a list of lists.
Dynamic Layouts (Adding / Removing Elements)
Once a layout used to create a window, you cannot directly modify the "list of lists" layout. Instead you'll use a combination of calls to change the elements contained in your Window.
See the section on Dynamic Layouts for techniques on how to make your layouts change over time.
Manipulating Layouts
You can use Python's list concatenation operations very effectively within layouts or to build layouts in a loop. The 2 most common operations:
- Concatenating 2 layouts so that the rows of one layout are added to the bottom of another -
[[A]] + [[B]] = [[A], [B]] - Concatenating within the same row
[[A] + [B]] = [[A, B]]
Generated Layouts
You can generate layouts using Python code. One method is to use a for-loop to build a row or build multiple rows. Depending on and you can also use Python's very powerful list comprehensions.
- List Comprehension to generate a row
[A for x in range(10)] = [A,A,A,A,A...] - List Comprehension to generate multiple rows
[[A] for x in range(10)] = [[A],[A],...]
Example - List Comprehension To Concatenate Multiple Rows - "To Do" List Example
Let's create a little layout that will be used to make a to-do list using PySimpleGUI.
Brute Force
import PySimpleGUI as sg

layout = [  [sg.Text('1. '), sg.In(key='-IN 1-')],
            [sg.Text('2. '), sg.In(key='-IN 2-')],
            [sg.Text('3. '), sg.In(key='-IN 3-')],
            [sg.Text('4. '), sg.In(key='-IN 4-')],
            [sg.Text('5. '), sg.In(key='-IN 5-')],
            [sg.Button('Save'), sg.Button('Exit')] ]

window = sg.Window('To Do List Example', layout)
event, values = window.read()
The output from this script was this window:

Take a moment and look at the code and the window that's generated. Are you able to look at the layout and envision the Window on the screen?
Build By Concatenating Rows
The brute force method works great on a list that's 5 items long, but what if your todo list had 40 items on it. THEN what? Well, that's when we turn to a "generated" layout, a layout that is generated by your code. Replace the layout= stuff from the previous example with this definition of the layout.
import PySimpleGUI as sg

layout = []
for i in range(1,6):
    layout += [sg.Text(f'{i}. '), sg.In(key=f'-IN {i}-')],

layout += [[sg.Button('Save'), sg.Button('Exit')]]

window = sg.Window('To Do List Example', layout)
event, values = window.read()
It produces the exact same window of course. That's progress.... went from writing out every row of the GUI to generating every row. If we want 48 items as suggested, change the range(1,6) to range(1,48). Each time through the list another row is added onto the layout.
Notice the concatenation of the Buttons onto the end of the layout once it's built using the for-loop. Adding 2 lists of lists produces a result of concatenating rows onto the bottom of your window.
Create Several Rows Using List Comprehension
This is Python, we're using lists to build something up, so we should be looking at list comprehensions. Let's change the for loop into a list comprehension. Recall that our for loop was used to concatenate 6 rows into a layout.
layout =  [[sg.Text(f'{i}. '), sg.In(key=f'-IN {i}-')] for i in range(1,6)]
layout += [[sg.Button('Save'), sg.Button('Exit')]]
Here we've moved the for loop to inside of the list definition, making it a list comprehension. The Buttons can be easily "tacked onto the end" by simple addition.
But let's not stop there with compressing the code. How about removing that += and instead change the layout into a single line with just a + between the two sets of row.
Doing this concatenation on one line, we end up with this single statement that creates the entire layout for the GUI:
layout = [[sg.Text(f'{i}. '), sg.In(key=i)] for i in range(1,6)] + [[sg.Button('Save'), sg.Button('Exit')]]
Nesting Beyond 2 Levels
The tkinter port allows you to have more levels of lists so that you can write a layout without using a + and instead a ,
layout = [[[sg.Text(f'{i}. '), sg.In(key=f'-IN {i}-')] for i in range(1,6)] , [sg.Button('Save'), sg.Button('Exit')]]
Never Re-use Elements
You cannot "reuse a layout". If an element has already been used in a layout, that exact same element cannot be used.
Here's an example that's obviously re-using an element:
input_element = sg.Input(key='-IN-')

layout = [  [sg.Text('My Window')],
            [input_element],
            [input_element],
            [sg.Text(size=(12,1), key='-OUT-')],
            [sg.Button('Go'), sg.Button('Exit')]  ]
In this example the entire layout is attempting to be re-used.
layout = [  [sg.Text('My Window')],
            [sg.Text(size=(12,1), key='-OUT-')],
            [sg.Button('Go'), sg.Button('Exit')]  ]

window =  sg.Window('Window Title', layout)
window.read(close=True)

window =  sg.Window('Window Title', layout)
window.read(close=True)
If an element re-use is detected, you'll see an error similar to this:

Layout Helper Functions
| Layout Helper | Description |
|---|---|
| pin | "Pins" an element to a location in a layout. If element transitions from invisible to visible, pin ensures element stays in the correct location |
| vtop | Vertically align element or row of elements to the top of the row |
| vbottom | Vertically align element or row of elements to the bottom of the row |
| vcenter | Vertically align element or row of elements to the center of the row |
Vertical Alignment
On a single row, elements are aligned vertically-centered. For example, if a 1-row Text element is on the same row as a 3-row List box, the Text will line up with the second row of the Listbox.

If you want to change the vertical alignment, then you will need to use helper functions. There are 3 Layout Helper functions that adjust how elements are vertically aligned - vtop, vcenter, vbottom.
You can pass in individual elements or entire rows. Using the Text and Listbox example, placing the row in a call to vtop results in all of the elements being vertically aligned at the top.

Pinning Elements
When using the visible parameter with an element, you will most likely want to use the pin helpful function. This function will "pin" the element to the original location. If you do not pin an element, 2 things may happen:
- The element will move to the end of the container it is within when made visible after being invisible
- The window will fail to shrink when the element is made invisible
Elements Justification
Within a row, elements can be justified at left, right or center. The default is that all elements are left justified.
The Window object and the Container Elements have a parameter, element_justification that controls how all elements within the container or window are justified.
Push
You can move elements within a layout by "pushing" them around. The Push element will push elements away from it. If placed on first position on a row, all elements on that row will be "pushed" to the right and thus will be right justified. If you place a Push element on each end of a row, then all elements between them will be centered.
Here's a normal layout
Adding a push to the second row will right justify it:
 Placing a
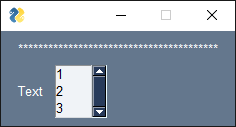
 Push on each end of the row centers the elements:
layout = [[sg.Text('*'*40)],
          [sg.Push(), sg.Text('Text'), sg.Listbox([1,2,3], size=(5,3)), sg.Push()]]

VPush
The VPush element pushes rows apart vertically. Rows placed between 2 VPush elements will center them vertically in their container.
layout = [  [sg.VPush()],
            [sg.Text('Resize me to see that I am vertically centered')],
            [sg.In()],
            [sg.In()],
            [sg.Button('Go'), sg.Button('Exit'), sg.Cancel(), sg.Ok()],
            [sg.VPush(), sg.Sizegrip()] ]           # toss a Sizegrip onto the bottom corner to make it easier


window = sg.Window('Window Title', layout, resizable=True)

window.read(close=True)
