Menus
The PySimpleGUI Menu Data Structure
When menus of any kind are specified in PySimpleGUI, they use a data structure format called the Menu Definition. Menu definitions are used in:
Menuelement- Right-click menus
ButtonMenuelementMenubarCustomelementSystemTraymenu definition
This data structure is used for all ports of PySimpleGUI as well as the psgtray project that implements a system tray for the tkinter port of PySimpleGUI.
Defined Versus Built
A design decision made when creating PySimpleGUI was to represent menus in a data structure that could be written in a line of code, resulting in compact code. Another approach is to use code that loops and "adds" each item to a menu data structure. This second approach is how most GUI frameworks are designed.
Menu as an Outline
Let's zoom out and look at menus generically. Menus can be represented by an outline.
This outline assumes you can have more items "under" any item. As each new level is added, another number is added to the Item. Item 1-2 means Heading 1, second item. Item 2-2-1 means Heading 1, second item, and then the first item under that second item.
- Main 1
- Item 1-1
- Item 1-2
- Item 1-3
- Main 2
- Item 2-1
- Item 2-2
- Item 2-2-1
- Item 2-2-2
- Item 2-3
If this was turned into a menu, we would call the items under another item a "sub-menu". If you may encounter the GUI term "cascading menu", then it's one of these sub-menus. You can add as many levels of "sub-menus" as you desire.
Let's render this outline as a window Menu....

Notice how each new "level" makes a new sub0-menu
Outline to Menu Data Structure
Each "level" in the outline is simply a list. From the top-most level, we see two items 'Main 1' and 'Main 2'. That means we've got a menu definition that has a list with 2 items in it.
Not surprisingly, creating a "new level" in our outline means creating a new list in the data structure.
The most important rule in the PySimpleGUI menu definitions is that a string followed by a list means the start of a sub-menu/another level.
Here is the Menu Definition that matches the outline above, formatted using the same indentation. It's a little difficult to read this way.
menu_def = [['Main 1',
                ['Item 1-1',
                 'Item 1-2',
                 'Item 1-3']],
            ['Main 2',
                ['Item 2-1',
                 'Item 2-2',
                    ['Item 2-2-1',
                     'Item 2-2-2'],
                 'Item 2-3']]]
While this format looks good initially, adding the syntax for lists makes it a little confusing.
Let's rewrite it in a format that's more in-line with the Python language's syntax. This is how the same data structure tends to be written in PySimpleGUI code. Each main menu item is on a new line. Sub-menus are added in-line without adding a newline. It's still highly readable in this form.
menu_def = [['Main 1', ['Item 1-1', 'Item 1-2', 'Item 1-3']],
            ['Main 2', ['Item 2-1', 'Item 2-2', ['Item 2-2-1', 'Item 2-2-2'], 'Item 2-3']]]
When "parsing" one of these visually, scan each line looking for a list. If you find one, then you know that means the contents are a sub-menu and that the heading is the string immediately before it.
Realistic Example
Instead of Main and Item, this example implements a simple menu that you may encounter in a program.
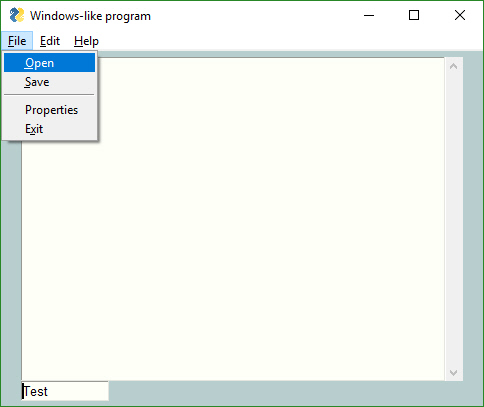
menu_def = [['&File', ['!&Open', '&Save::savekey', '---', '&Properties', 'E&xit']],
            ['&Help', ['&About...']]]
In this case the 2 "Main" entries are File and Help.

Items In the Menu
Each entry in the Menu Definition represents something that will be shown to the user. In addition to the text in the string, there can be special characters.
!- if a string starting with!, then that item is disabled and will be grayed out&- this character is used to indicate the character following is a "shortcut". You can use theAltkey with this character in order to choose that menu item---- An entry with just these 3 characters will cause a line to be added::- These characters mark the beginning of a Menu Key
Menu Shortcut keys
You have used ALT-key in other Windows programs to navigate menus. For example Alt-F+X exits the program. The Alt-F pulls down the File menu. The X selects the entry marked Exit.
The good news is that PySimpleGUI allows you to create the same kind of menus! Your program can play with the big-boys. And, it's trivial to do.
All that's required is for your to add an "&" in front of the letter you want to appear with an underscore. When you hold the Alt key down you will see the menu with underlines that you marked.
One other little bit of polish you can add are separators in your list. To add a line in your list of menu choices, create a menu entry that looks like this: '---'
This is an example Menu with underlines and a separator.
# ------ Menu Definition ------ #
menu_def = [['&File', ['&Open', '&Save', '---', 'Properties', 'E&xit'  ]],
            ['&Edit', ['Paste', ['Special', 'Normal',], 'Undo'],],
            ['&Help', ['&About...']]]
Disabled Menu Entries
If you want one of your menu items to be disabled, then place a '!' in front of the menu entry. To disable the Paste menu entry in the previous examples, the entry would be:
['!&Edit', ['Paste', ['Special', 'Normal',], 'Undo'],]
If your want to change the disabled menu item flag / character from '!' to something else, change the variable MENU_DISABLED_CHARACTER
Keys for Menus
Beginning in version 3.17 you can add a key to your menu entries. The key value will be removed prior to be inserted into the menu. When you receive Menu events, the entire menu entry, including the key is returned. A key is indicated by adding :: after a menu entry, followed by the key.
To add the key _MY_KEY_ to the Special menu entry, the code would be:
['&Edit', ['Paste', ['Special::_MY_KEY_', 'Normal',], 'Undo'],]
If you want to change the characters that indicate a key follows from '::' to something else, change the variable MENU_KEY_SEPARATOR
MenuBar Element
Use the Menu element to add a menubar to your window.
    menu_def = [['File', ['Open', 'Save', 'Exit',]],
                ['Edit', ['Paste', ['Special', 'Normal',], 'Undo'],],
                ['Help', ['About...']]]
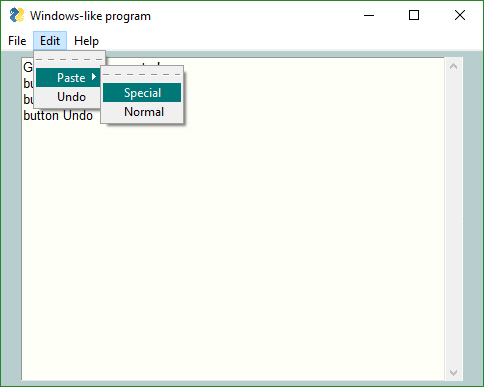
Note the placement of ',' and of []. It's tricky to get the nested menus correct that implement cascading menus. See how paste has Special and Normal as a list after it. This means that Paste has a cascading menu with items Special and Normal.
To add a menu to a Window place the Menu or MenuBar element into your layout.
layout = [[sg.Menu(menu_def)]]
It doesn't really matter where you place the Menu Element in your layout as it will always be located at the top of the window.
When the user selects an item, it's returns as the event (along with the menu item's key if one was specified in the menu definition)
MenubarCustom Element
The MenubarCustom element enable you to use custom colors in your menubar. The way this is achieved is by not utilizing the menu widget supplied by tkinter, but instead build what appears to be a menubar using ButtonMenu elements.
ButtonMenus
Button menus were introduced in version 3.21, having been previously released in PySimpleGUIQt. They work exactly the same and are source code compatible between PySimpleGUI and PySimpleGUIQt. These types of menus take a single menu entry where a Menu Bar takes a list of menu entries.
Return values for ButtonMenus are different than Menu Bars.
You will get back the ButtonMenu's KEY as the event. To get the actual item selected, you will look it up in the values dictionary. This can be done with the expression values[event]
Right Click Menus
Right Click Menus were introduced in version 3.21. Almost every element has a right_click_menu parameter and there is a window-level setting for rich click menu that will attach a right click menu to all elements in the window.
The menu definition is the same as the button menu definition, a single menu entry.
The first string in a right click menu and a button menu is ignored. It is not used. Normally you would put the string that is shown on the menu bar in that location.Return values for right click menus are the same as MenuBars. The value chosen is returned as the event.